This approach can be employed for all acoustic instruments with active circuitry and/or pickups
This article assumes that you have an acoustic guitar with a built-in preamp or pickup of some type, that can plug into a guitar effects unit. The aim is to get the most out of your recording in one take, while allowing for multiple options when the time comes to do a final mix. The process is quite simple and relatively easy to set up. The result will be a total of five tracks recorded from a single take.
In summary we will be recording:
- A pair of microphones to capture a stereo image of your acoustic guitar's natural sound
- A dry mono signal (nice and clean with no effects),
- Another stereo signal through an effects pedal (with chorus, delay, reverb, etc.).
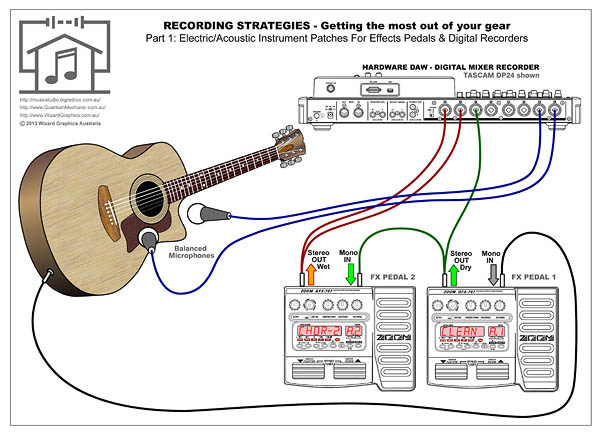
The provided diagrom shows the basic layout (the cable colours used are just to make the diagram easier to understand). A larger version of the diagram can be obtained by clicking on the image below. Another browser window will open displaying a larger JPEG file which you may print and/or save to your computer. Please respect the copyright.
It's always nice to have options, and that is the underlying point of this excercise. So here are the details ...
- One pair of inputs on the Digital Recorder will take a couple of mics. These can be set up for either:
- Close mic'ing, to capture a clean stereo image of your acoustice guitar. The distance from the front of the guitar to each microphone should be around 30cm (1 foot). This will generally do the job. Any closer and you may have difficulty playing. The mic's want to be at least 30 to 45 cm apart and angled-in to point at the back of the guitar behind the soundhole. Don't point them into the soundhole unless you like a 'boomy' sound.
The aim is to capture the sound from the front surface of the guitar from two points, The first is toward the neck and the second near the bridge. The quality of the guitar (and its wood) will determine the nature of the sound you get. Don't be afraid to shuffle things around and look for the 'sweet-spot' for each mic.
Closer mic'ing captures more high frequencies (brightness), further away sounds progresively duller.
- Remote mic'ing, generally at least 1m (3 foot) away from the guitar is used to capture room ambience. You will need a very quiet studio and some really low noise microphones for this to work effectively. You don't however have to record to a input high level, since the purpose of this approach is only to add ambience to your final mix. This of course assumes that your recording environment provides an ambient sound that you are happy with (which could take some effort to set up).
- Another option (not shown in the diagram)
is to use a combination of the above two mic'ing methods, by close mic'ing to capture the direct stereo sound, then using a third remote mic to capture room ambience.
- Close mic'ing, to capture a clean stereo image of your acoustice guitar. The distance from the front of the guitar to each microphone should be around 30cm (1 foot). This will generally do the job. Any closer and you may have difficulty playing. The mic's want to be at least 30 to 45 cm apart and angled-in to point at the back of the guitar behind the soundhole. Don't point them into the soundhole unless you like a 'boomy' sound.
- A further three inputs going to your Digital Recorder are electronic in origin. This part requires a pair of very clean (low noise, low distortion) effects pedals with stereo outputs.
- The first pedal will be used simply as a signal splitter/conditioner to provide a nice clean 'dry' stereo output. It's important to be able to switch off/out any effects or unwanted tone controls. One part of this dry stereo signal will go directly to the Digital Recorder, the other part goes to the input of effects unit two.
By recording a dry version of your song, you will have the opportunity to add/remove effects later during mix-down, without having to do a retake.
- You could use a dedicated preamp as a signal splitter if you happen to have one that has a mono input to stereo output, and that will work from either a 9V or 12V power supply. Good quality preamps will often require mains power, and one of our aims is to work without mains. Effect pedals of course are designed to run on batteries and generally still have respectable noise and distortion specifications.
- The second pedal will actually be used as an effects pedal. Generally this will be for your favourite DSP (Digital Signal Processor) effects like Chorus, Delay and Reverb. Even if you only slightly 'over-do' the DSP effects in the recording process, you will quickly realise why having the dry signal was such a good idea.
- The first pedal will be used simply as a signal splitter/conditioner to provide a nice clean 'dry' stereo output. It's important to be able to switch off/out any effects or unwanted tone controls. One part of this dry stereo signal will go directly to the Digital Recorder, the other part goes to the input of effects unit two.
- Why use a preamp or pedal as a signal splitter?
When you share a high-impedance guitar signal into 2 inputs, only half of your signal is available at each input. Lower signal levels equate to higher noise levels. Also the impedance of that signal will be changed (generally lowered) resulting in some loss of tone (particularly in the higher frequencies).
By putting your guitar signal into a Preamp first, there is no input impedance mismatch, and the resulting output level will be more than adequate to drive multiple devices.
Note:
It is recomended that stereo signals (microphones and wet effects out) are recorded to stereo tracks. This will greatly simplify any EQ (Equaliser) settings or other signal processing made during the final mix-down, since you can effect both the Left and Right channels simultaneously.
Wizard - 130219

