
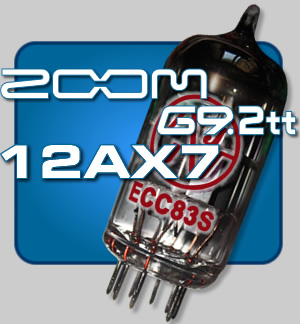
There are Vacuum Tube purists out there who might make quite a song and dance routine out of selecting just the right 12AX7 pair based on output specs and the 'timbre' of a given tube's sound. However, keep in mind, this is not a high-end audiophile preamp. Seriously, this device still utilizes the old RC4558 dual op amps (I didn't realise they still made those nasty things).
So for example: There is absolutely no point to buying a matched pair of 12AX7s (at considerable extra cost), when one tube is used at the input stage and the other tube at the output.
In this application, the reality is that the vacuum tubes are there to introduce some distortion.
If you run your
G9.2tt on the clean side (as I do), well, those tubes aren't going to be contributing all that much to your sound. That said however, it's nice to know that you have it, if and when you want it.
So my recommendation is that some reasonable quality (and reasonably priced) tubes will do nicely.
A Reader's Recommendation
"I have installed two 12at7 instead of the original 12ax7, just to avoid tube crunch, though adding tube clarity and typical natural compression".
It's always nice to have options ;-)
About Valves in Solid State Gear
I came across a comical old thread (from 2012) on the Steinberg forum, where a bunch of wannabe valve experts waste oxygen deriding the inclusion of valves in any solid state equipment, including the Zoom G9.2tt.
The comments/arguments follow the
well-worn track of:
'it's all just a gimmick',
'there is no real benefit',
'they'll never sound like valves in an amp'
... and so on ... yawn.
Well boys and girls ...
- it's all just bullshit.
Having compared (that is 'side by side'), the sound I can get from the Zoom G9.2tt and a Ceriatone boutique (all valve) amplifier - I can assure you that the G9.2tt can indeed produce the same rich tones.
What's more ... this can be achieved in a variety of different ways and that includes without even utilizing the two 12AX7 tubes.
Your honour, I rest my case ...
PS:
These days I run an AXE-FX 3 Mk2, with absolutely NO valves. Yet the AXE-FX can be made to sound like any valve amp - real or imagined! ... plus, for the adventurous, it can be tweaked endlessly!
GEAR RELATED ARTICLES
[Home Music Recording Studio]
GUITAR AMPLIFIERS:
Acoustic 450 - 170W Guitar / Bass Amp Head
Behringer Ultrabass BXL1800A 180W Bass Amp
Fender Princeton Chorus 51W Compact Amp
GUITARS:
Aspen AD25 6 String Acoustic Guitar
Esteve Model 8 Classical Guitar
La Patrie Concert CW QIT Classical Guitar
La Patrie Presentation Classical Guitar
Fender DG-14SCE Nat Acoustic Guitar
Godin XtSA Electric Guitar
Godin Freeway Classic Electric Guitar
Ibanez RG8 8 String Electric Guitar
Jim Beam Devil's Cut 335 clone
Maton EM125C - 6 String Acoustic Guitar
Maton EM425C/12 12 String Acoustic Guitar
Maton Mastersound MS500 - 6 Str Electric Guitar
Yamaha FG-410-12A 12 String Acoustic
Yamaha G-228 6 String Classical
GUITAR FX - The Chronicles of Zoom:
ZOOM GFX-707 - Review and Description
ZOOM 707 II - Review and Description
ZOOM BFX-708 - Bass Guitar Multi Effects Pedal
ZOOM G9.2tt - Guitar Effects Console
Behringer EM600 Echo Machine Stomp Box
Behringer RV600 Reverb Machine Stomp Box
ROLAND U-220 - Vintage Sound / Synth Module
SN-U110 and SN-MV30-S1 Series PCM Cards
Behringer FBQ1502HD Ultragraph Pro
Behringer Eurorack Pro RX1602 Rackmount Mixer
Capabilities of the CASIO WK-7500 Workstation
Presonus Eris E5 Powered Monitor Speakers
Vonyx (Skytec) SPJ-1000A Active 10" Speaker
[ Advertising ]
The first thing to mention: Beware of a YouTube video that often comes up highly placed in searches (xxxx.com/watch?v=SMuZwGTvbf0 dated 10 Aug 2011), done on some guys mobile phone, that is way wrong.
In the video a whole bunch of 'unnecessary undoing' happens, including the removal of metal shielding around the tubes - nope - two screws at the bottom of each 12AX7 tube-mount circuit board, will allow the boards to be easily removed and replaced. It really is that simple.
Of course to get inside the G9.2tt in the first place, well lets just say, if you are not the patient type ... let someone else do this.
Before going further it might be prudent to ask the question ...
Do the Zoom G9.2tt vacuum tubes actually need replacing?
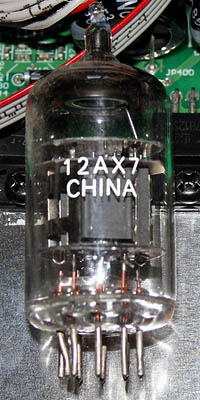 Firstly, new vacuum tubes do make a difference to the sound. Quite obviously, the more one uses the 'Accelerator' and/or 'Energizer' settings, the greater the noticeable effect will be. If tube distortion is why you purchased this box, then new tubes will almost certainly put a smile on your face.
This is generally where people will get into a barney about the mystical qualities of various different valves and the nuances of distortion vs clarity offered, when the Moon is in the seventh house and Jupiter aligns with Mars then peace will rule the planets and love will guide the stars (... for the youngsters, that's a reference to the Age of Aquarius, which we somehow seem to have missed).
But realistically, for those of us that run a primarily clean sound, new tubes do not make a radical difference. In fact, slightly better clarity in the form of enhanced brightness is about it. (Just FYI: I own two G9.2tt's and have replaced the tubes in both.)
So in summary - How noticeable the difference is with new tubes will depend on how much tube warmth you have dialed in via the 'Accelerator" and/or 'Energizer' knobs.
The real question is how do you know whether the vacuum tubes 'need' replacing. Sadly the answer is ... unless they have actually ceased to function, there really isn't any way to readily know.
Removing and visually inspecting the vacuum tubes may indicate whether they have seen a lot operational hours (by the amount of 'silvering' at the top of the tube), but that is hardly definitive. If the tubes happen to be unlabelled or labelled CHINA, they may well be the original vacuum tubes shipped with that G9.2tt ... there's a hint.
Given the G9.2tt has been around since at least March of 2007, this is equipment that could easily be around
years old. Just to say that most G9.2tt's you are likely to encounter will probably be due to have their 12AX7s replaced (if they haven't been already).
An Important Note: It is not so much the age of the tubes (in operational hours) that is the real issue. It's that they live inside a hefty stomp box, that is quite likely to get banged about during normal use and while in transit. Tubes are just not into that kind of rough handling. Bear in mind that most tubes are rated for a working life of ten thousand hours or better, or 5.5 years at 5 hours usage per day.
Some G9.2tt sellers on eBay, quite rightly make a point of mentioning that they have already replaced the vacuum tubes and often even reference the make and type of replacement tube that was installed.
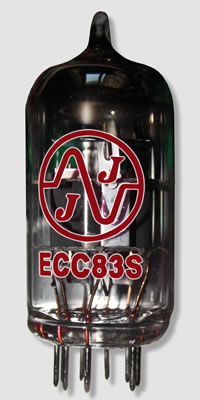 Factor in approximately AUD $60 to $100 for a pair of 12AX7s (or similar), and another $50 to $100 if you get the G9.2tt professionally serviced/repaired (e.g. get the pedals greased [yep, that's a thing] and the bugs vacuumed out).
In short, a service + two new vacuum tubes could easily add AUD $200 to the cost of a Zoom G9.2tt. Keep that in mind before you rush out and buy that $300 eBay bargain.
If you have decided to go ahead with this madness, and you have already acquired some shiny new 12AX7s or equivalent, then ...
There are no less than 26 screws that have to be taken out to remove the bottom panel and expose the circuit boards and 12AX7 vacuum tube mounting boards.
And just to keep life interesting, those screws (you know this is coming right?) ... they are NOT all the same.
![]()
Yes it's true, there are a few that go down the sides (3 on each side) that are just a little longer than the others. It's a real good idea not to get them mixed up. See the photo/diagram below for reference.
So the hardest and slowest part of this whole process is getting the case open. No Joke. You could use a powered screwdriver, but if you damage the screw heads and/or any of the threads ... well, not a good look ... and a bitch to reassemble.
First however ... unplug ALL leads.
This thing is heavy! If you drop it with any leads connected, something is sure to break and/or snap off. Also, if nothing is plugged in, it can't be powered up and you won't get an unexpected electric surprise and possible visit from your friendly local paramedics (or worse).
The up-side is that all you need to complete this task is a pair of new 12AX7s and a Philips Head (star) screwdriver, and I think I already mentioned the patience. A well lit place to work (and/or LED headlight) and a couple of small containers for those screws will also be handy.
For a quick reference, the pic below shows the location of the 6 longer case screws and the mounting screws for the 12AX7 mounting circuit boards (click on image for larger version).
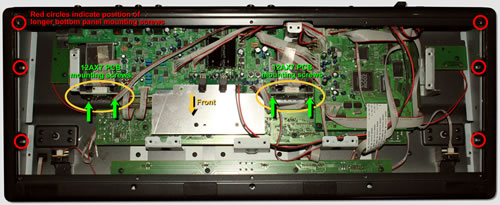
From here removing the small square circuit boards that hold the ceramic vacuum tube mounts is easy, just two screws each. Once undone, pull the circuit boards gently toward the front of the unit, then up and out of their enclosure.
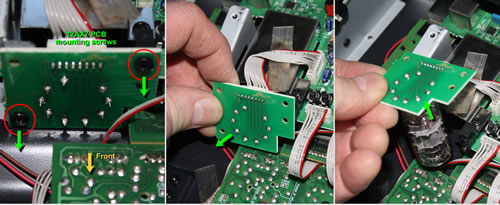
Each vacuum tube
is held in place by a ceramic mount. Remove the tube by gently wiggling it back and forth while applying some outward pressure. Try not to force it. If you damage / break the ceramic mount this project can go from DIY to 'Off to the Service Shop' in the blink of an eye.
Also, don't be tempted to unplug the connector cable to the vacuum tube mount PCB. This only creates more work and may have unintended consequences. It is not necessary to do this to replace the vacuum tubes.
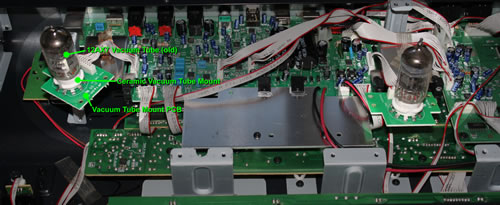
Once the vacuum tube is removed, simply insert the replacement tube with even gentle pressure (they can only fit one way).
Check the PCB (Printed Circuit Board) that the ceramic mount is attached to for signs of heat damage (usually indicated by a darkening / browning of the PCB).
I say this primarily because, given that you've gone to the trouble to crack this thing open, you might as well make sure all is well while you are there.
Heading off problems is easier than repairs after something has been cooked. You may for example find a bunch of dead bugs around the tubes (fatally attracted to the glow). Vacuum out the inside of the case as required (gently!).
All being well, slip each of the PCBs back into it's niche and replace the two retaining screws. When complete, flip it over, plug it in and make sure it's all working. If all is good, disconnect from power again.
Pat self on back, job well done .... now put the bottom plate back on ... guaranteed to take at least some of the smile off your face ;-)
But - that's it!
Take care with what you're doing and all should go smoothly.
Your comments and contributions are greatly appreciated!
Was this page useful?
Rate This Page:
| Page Ratings so far ... | ||
| Excellent | 32 | |
| Very Good | 1 | |
| Useful | 0 | |
| Not Useful | 0 | |
| TOTAL | 33 | |
Page online for years and still active
Your Comments:
231127 - (Excellent) -
STUPENDOUS! Thank You very, very much and Sincerely too.
Editor's Note: Thanks! ;-)
231021 - (Excellent) -
Hi, Thank you for the detailed explanation of valve replacement. So glad I ran across your page. I'm thinking about taking the bottom off of mine and checking everything out. If the tubes (valves) look bad, I'll replace them. I don't have a matched set of AX7s. I have an 7025/E83CC High Grade which is supposed to have more gain and I have a 7025/ 12AX7 WA which has a about 80% lower gain than a plain 12 AX7. Maybe you could help me out as to which one should go where.
Editor's Note: Good questions.
As mentioned in the article, the tubes are there primarily to provide that 'tube warmth' at low levels and then full-on distortion when cranked up. Since there are independent level controls for each tube amplification section (Accelerator & Energizer), the choice of what to put where is kind-of academic. Matched tubes are also irrelevant in this application.
My suggestion would therefore be dependant on use case:
- For high input gain or drive tone – put the higher output tube at the front end (Accelerator), which then creates potentially more input drive (and hopefully it won't fry anything). This also applies if you don't generally use the G9 with the output (Energizer) turned way up (i.e. you have plenty of headroom).
- For Lower input gain or mostly clean tone - opposite of the above (lower output 12AX7 goes to Accelerator/input).
- Unless you normally run the G9 with substantially high tube settings for the Accelerator and Energizer, there should be minimal noticeable effect to changing the tubes. You should be able to reproduce any current setting/sound with minimal tweaking.
221027 - (Excellent) -
Hello from France, thanks for this!
I had the chance to buy a 30€ G9.2tt (yes €) but stop dreaming: it's not working. Lights turn on, but no sound. I was thinking tubes may need a change, because they don't light up at all (the test routine in service manual light up the bulbs, it says). So I cross my fingers and will follow this helpful lines.
Editor's Note: I'm sorry to hear that your acquisition isn't working properly. This device is so complicated that any number of issues might be the cause. However, if both of the tubes are not lighting up, that suggests a problem with the power supply to the tubes, rather than the tubes themselves.
I started making a list of things to check and quickly concluded that it gets so complicated, that this job is best done by a qualified technician. So I truly wish you well and hope that a tube change will do the job for you. Of course, first thing to check is the output level knob and switch on the back.
221027 - (Excellent) - Thanks for taking the time to post this. Editor's Note: You're welcome.
200531 - (Excellent) - I have been looking for information like this for a while. I do have a question though, any idea what the anode plate voltage is for the Tubes?
Editor's Note: Sorry, I was rather keen to get both my Zoom devices reassembled and functional again. I didn't take the time to poke around the G9's inards with the power on. It is an interesting question though. Worth noting is that the supply provides 15VAC @1.5A, which is rather beefy for pedal board.
200531 - (Excellent) - Just changed my valves! 10 years going strong! Cheers mate.
200517 - (Excellent) - Excellent stuff mate!
Editor's Note: Appreciated!
180714 - (Excellent) - awezome
Editor's Note: ;-)
180616 - (Excellent) - Thanks.
Editor's Note: You're welcome.
Incept Date: Wizard - 160803
Last Update: Wizard - 240106
